In part I of this post we laid out in detail how to run a large Jenkins CI farm in Mesos. In this post we explore running the builds inside Docker containers and more:
-
Explain the motivation for using Docker containers for builds.
-
Show how to handle the case where the build itself is a Docker build.
-
Peek into how the Mesos 0.19 release is going to change Docker integration.
-
Walk through a Vagrant all-in-one-box setup so you can try things out.
Overview
Jenkins follows the master-slave model and is capable of launching tasks as remote Java processes on Mesos slave machines. Mesos is a cluster manager that provides efficient resource isolation and sharing across distributed applications or frameworks. We can leverage the capabilities of Jenkins and Mesos to run a Jenkins slave process within a Docker container using Mesos as the resource manager.
Why use Docker containers?
This page gives a good picture of what Docker is all about.
At eBay Inc., we have several different build clusters. They are primarily partitioned due to a number of factors: requirements to run different OS flavors (mostly RHEL and Ubuntu), software version conflicts, associated application dependencies, and special hardware. When using Mesos, we try to operate on a single cluster with heteregeneous workloads instead of having specialized clusters. Docker provides a good solution to isolate the different dependencies inside the container irrespective of the host setup where the Mesos slave is running, thereby helping us operate on a single cluster. Special hardware requirements can always be handled though slave attributes that the Jenkins plugin already supports. Overall, then, this setup scheme helps maintain consistent host images in the cluster, avoids having to introduce a wide combination of different flavors of Mesos slave hosts running, yet handles all the varied build dependencies within a container.
Now why support Docker-in-Docker setup?
When we started experimenting with running the builds in Docker containers, some of our teammates were working on enabling Docker images for applications. They posed the question, How do we support Docker build and push/pull operations within the Docker container used for the build? Valid point! So, we will explore two ways of handling this challenge. Many thanks to Jérôme Petazzoni from the Docker team for his guidance.
Environment setup
A Vagrant development VM setup demonstrates CI using Docker containers. This VM can be used for testing other frameworks like Chronos and Aurora; however, we will focus on the CI use of it with Marathon. The screenshots shown below have been taken from the Vagrant development environment setup, which runs a cluster of three Mesos masters, three Mesos slave instances, and one Marathon instance. (Marathon is a Mesos framework for long-running services. It provides a REST API for starting, stopping, and scaling services.)
192.168.56.101 mesos1 marathon1
192.168.56.102 mesos2
192.168.56.103 mesos3
Running Jenkins slaves inside Mesos Docker containers requires the following ecosystem:
- Jenkins master server with the Mesos scheduler plugin installed (used for building Docker containers via CI jobs).
- Apache Mesos master server with at least one slave server .
- Mesos Docker Executor installed on all Mesos slave servers. Mesos slaves delegate execution of tasks within Docker containers to the Docker executor. (Note that integration with Docker changes with the Mesos 0.19 release, as explained in the miscellaneous section at the end of this post.)
- Docker installed on all slave servers (to automate the deployment of any application as a lightweight, portable, self-sufficient container that will run virtually anywhere).
- Docker build container image in the Docker registry.
- Marathon framework.
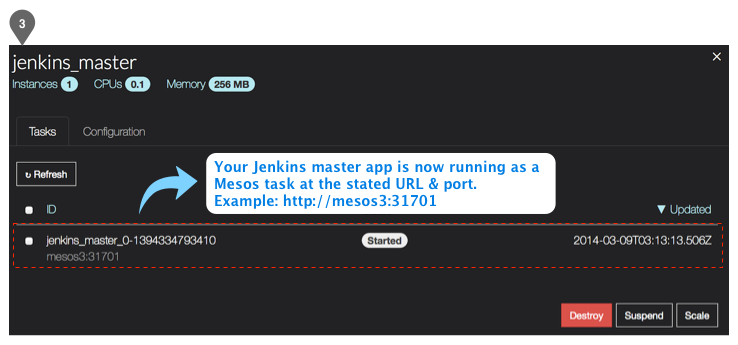
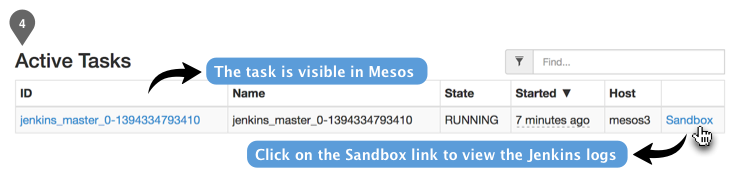
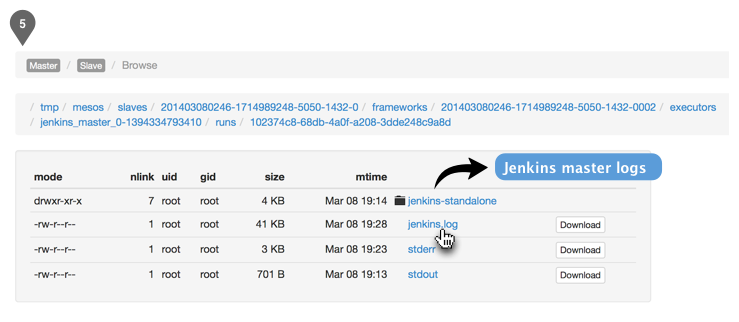
1. Creating the Jenkins master instance
We needed to first launch a standalone Jenkins master instance in Mesos via the Marathon framework. We placed Jenkins plugins in the plugins directory, and included a default config.xml file with pre-configured settings. Jenkins was then launched by executing the jenkins.war file. Here is the directory structure that we used for launching the Jenkins master:
.
 ├── README.md
 ├── config.xml
 ├── hudson.model.UpdateCenter.xml
 ├── jenkins.war
 ├── jobs
 ├── nodeMonitors.xml
 ├── plugins
 │   ├── mesos.hpi
 │   └── saferestart.jpi
 └── userContent
 └── readme.txt
 3 directories, 8 files
2. Launching the Jenkins master instance
Marathon launched the Jenkins master instance using the following command, also shown in the Marathon UI screenshots below. We zipped our Jenkins files and downloaded them for the job by using the URIs field in the UI; however, for demonstration purposes, below we show using a Git repository to achieve the same goal.
git clone https://github.com/ahunnargikar/jenkins-standalone && cd jenkins-standalone;
export JENKINS_HOME=$(pwd);
java -jar jenkins.war
--webroot=war
--httpPort=$PORT0
--ajp13Port=-1
--httpListenAddress=0.0.0.0
--ajp13ListenAddress=127.0.0.1
--preferredClassLoader=java.net.URLClassLoader
--logfile=../jenkins.log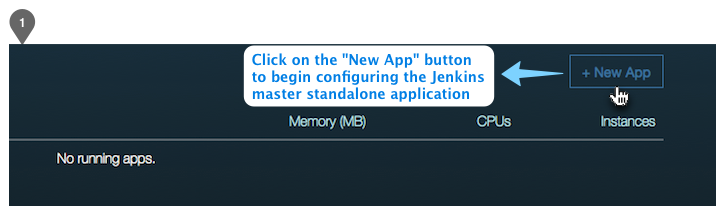

3. Launching Jenkins slaves using the Mesos Docker executor

Here’s a sample supervisord startup configuration for a Docker image capable of executing Jenkins slave jobs:
[supervisord]
nodaemon=true

[program:java-jenkins-slave]
command=/bin/bash -c "eval $JENKINS_COMMAND"
As you can see, Jenkins passed its slave launch command as an environment variable to the Docker container. The container then initialized the Jenkins slave process, which fulfilled the basic requirement for kicking off the Jenkins slave job.
This configuration was sufficient to launch regular builds within the Docker container of choice. Now let’s walk through the two options that we explored to run Docker operations for a CI build inside a Docker container. Strategy #1 required use of supervisord to control the Docker daemon process. For the default case (regular non-Docker builds) and strategy #2, supervisord was not required; one could simply pass the command directly to the Docker container.
3.1 Strategy #1 – Using an individual Docker-in-Docker (dind) setup on each Mesos slave
This strategy, inspired by this blog, involved a dedicated Docker daemon inside the Docker container. The advantage of this approach was that we didn’t have a single Docker daemon handling a large number of container builds. On the flip side, each container was now absorbing the I/O overhead of downloading and duplicating all the AUFS file system layers.

The Docker-in-Docker container had to be launched in privileged mode (by including the “-privileged” option in the Mesos Docker executor code); otherwise, nested Docker containers wouldn’t work. Using this strategy, we ended up having two Docker executors: one for launching Docker containers in non-privileged mode (/var/lib/mesos/executors/docker) and the other for launching Docker-in-Docker containers in privileged mode (/var/lib/mesos/executors/docker2). The supervisord process manager configuration was updated to run the Docker daemon process in addition to the Jenkins slave job process.
[program:docker]
command=/usr/local/bin/wrapdocker
The following Docker-in-Docker image has been provided for demonstration purposes for testing out the multi-Docker setup:
ahunnargikar/jenkins-dind/multiple-dockerIn real life, the actual build container image would capture the build dependencies and base image flavor, in addition to the contents of the above dind image. The actual command that the Docker executor ran looked similar to this one:
docker run -cidfile /tmp/docker_cid.6c6bba3db72b7483-privileged-c 51 -m 302365697638 -e JENKINS_COMMAND=wget -O slave.jar http://192.168.56.101:9000/jnlpJars/slave.jar && java -DHUDSON_HOME=jenkins -server -Xmx256m -Xms16m -XX:+UseConcMarkSweepGC -Djava.net.preferIPv4Stack=true -jar slave.jar -jnlpUrl http://192.168.56.101:9000/computer/mesos-jenkins-beb3a8ae-3de7-4117-8c4e-efe50b37fbb4/slave-agent.jnlp hashish/jenkins-dind
3.2 Strategy #2 – Using a shared Docker Setup on each Mesos slave
All of the Jenkins slaves running on a Mesos slave host could simply use a single Docker daemon for running their Docker containers, which was the default standard setup. This approach eliminated redundant network and disk I/O involved with downloading the AUFS file system layers. For example, all Java application projects could now reuse the same AUFS file system layers that contained the JDK, Tomcat, and other static Linux package dependencies. We lost isolation as far as the Docker daemon was concerned, but we gained a massive reduction in I/O and were able to leverage caching of build layers. This was the optimal strategy for our use case.

The Docker container mounted the host’s /var/run/docker.sock file descriptor as a shared volume so that its native Docker binary, located at /usr/local/bin/docker, could now communicate with the host server’s Docker daemon. So all Docker commands were now directly being executed by the host server’s Docker daemon. This eliminated the need for running individual Docker daemon processes on the Docker containers that were running on a Mesos slave server.
The following Docker image has been provided for demonstration purposes for a shared Docker setup. The actual build Docker container image of choice essentially just needed to execute the Docker binary via its CLI. We could even have mounted the Docker binary from the host server itself to the same end.
ahunnargikar/jenkins-dind/single-docker
The actual command that the Docker executor ran looked similar to this:
docker run
-cidfile /tmp/docker_cid.6c6bba3db72b7483
-v /var/run/docker.sock:/var/run/docker.sock
-c 51 -m 302365697638
-e JENKINS_COMMAND=wget -O slave.jar http://192.168.56.101:9000/jnlpJars/slave.jar && java -DHUDSON_HOME=jenkins -server -Xmx256m -Xms16m -XX:+UseConcMarkSweepGC -Djava.net.preferIPv4Stack=true -jar slave.jar  -jnlpUrl http://192.168.56.101:9000/computer/mesos-jenkins-beb3a8ae-3de7-4117-8c4e-efe50b37fbb4/slave-agent.jnlp hashish/jenkins-dind-single
4. Specifying the cloud configuration for the Jenkins master
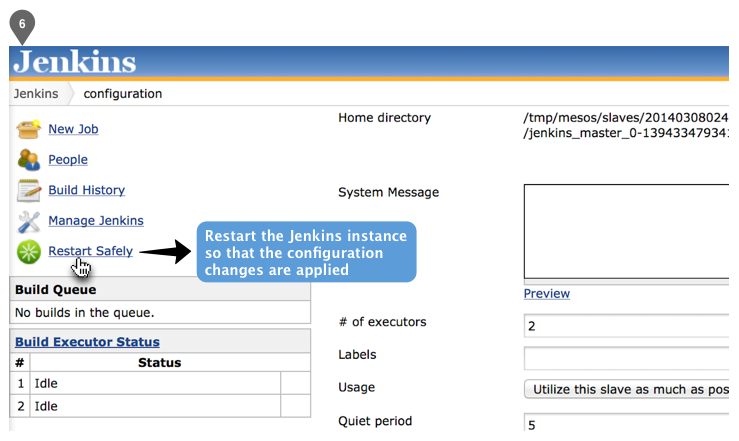
We then needed to configure the Jenkins master so that it would connect to the Mesos master server and start receiving resource offers, after which it could begin launching tasks on Mesos. The following screenshots illustrate how we configured the Jenkins master via its web administration UI.

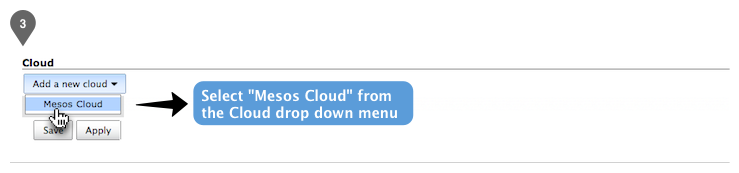
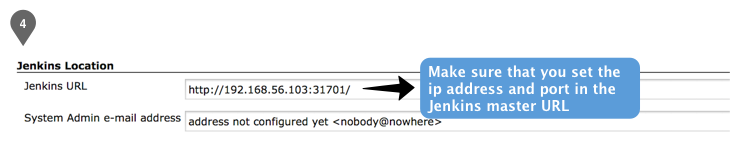

Note: The Docker-specific configuration options above are not available in the stable release of the Mesos plugin. Major changes are underway in the upcoming Mesos 0.19.0 release, which will introduce the pluggable containerizer functionality. We decided to wait for 0.19.0 to be released before making a pull request for this feature. Instead, a modified .hpi plugin file was created from this Jenkins Mesos plugin branch and has been included in the Vagrant dev setup.
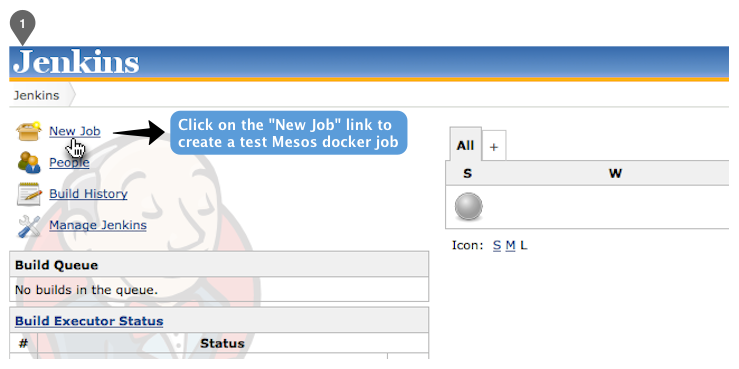
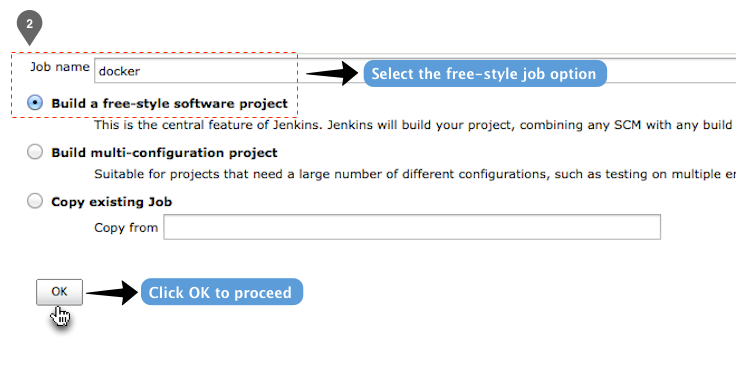
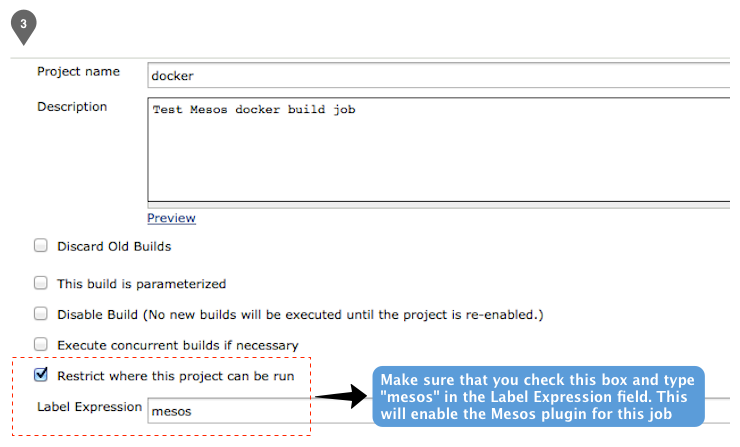
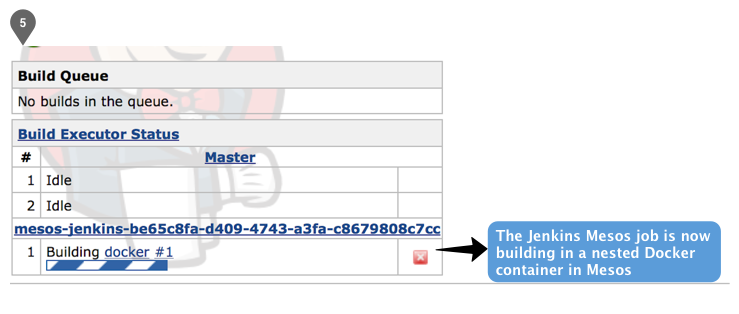
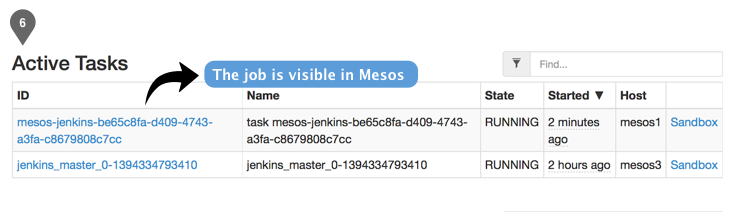
5. Creating the Jenkins Mesos Docker job
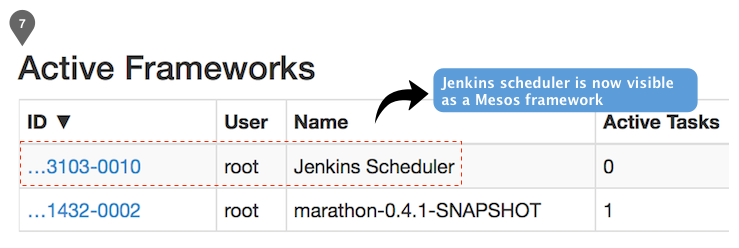
Now that the Jenkins scheduler had registered as a framework in Mesos, it started receiving resource offers from the Mesos master. The next step was to create a Jenkins job that would be launched on a Mesos slave whose resource offer satisfied the cloud configuration requirements.
5.1 Creating a Docker Tomcat 7 application container image
Jenkins first needed a Docker container base image that packaged the application code and dependencies as well as a web server. For demonstration purposes, here’s a sample Docker Tomcat 7 image created from this Github repository:
hashish/tomcat7Every application’s Git repository would be expected to have its unique Dockerfile with whatever combination of Java/PHP/Node.js pre-installed in a base container. In the case of our Java apps, we simply built the .war file using Maven and then inserted it into the Docker image during build time. The Docker image was then tagged with the application name, version, and timestamp, and then uploaded into our private Docker registry.
5.2 Running a Jenkins Docker job
For demonstration purposes, the following example assumes that we are building a basic Java web application.

Once Jenkins built and uploaded the new application’s Docker image containing the war, dependencies, and other packages, this Docker image was launched in Mesos and scaled up or down to as many instances as required via the Marathon APIs.
Miscellaneous points
Our Docker integration with Mesos is going to be outdated soon with the 0.19 release. Our setup was against Mesos 0.17 and Docker 0.9. You can read about the Mesos pluggable containerizer feature in this blog and in this ticket. The Mesosphere team is also working on the deimos project to integrate Docker with the external containerization approach. There is an old pull request against the Mesos Jenkins plugin to integrate containerization once it’s released. We will update our setup accordingly when this feature is rolled out. We’d like to add a disclaimer that the Docker integration in the above post hasn’t been tested at scale yet; we will do our due diligence once Mesos 0.19 and deimos are out.
For different build dependencies, you can define a build label for each. A merged PR already specifies the attributes per label. Hence, a Docker container image of choice can be added per build label.
Conclusion
This concludes the description of our journey, giving a good overview of how we ran a distributed CI solution on top of Mesos, utilizing resources in the most efficient manner and isolating build dependencies through Docker.
Editor's Note: The eBay PaaS Team contributed to this article.